Tips on Pranayama
Pranayama is nothing but the control of Breath. Prana means breath or the vital energy in our body. Prana represents the energy responsible for the life and "Ayama" means control. So Pranayama means control of breath. You can control the breath with pranayama and achieve healthy body and mind,
Benefits of Yoga Asanas
The yogic asanas help to improve your health by regulating the functioning of the internal organs. The regular practice of Yoga asanas brings good health, longevity, strength and vitality to the practitioner. By practicing the Yoga asanas regularly with care and attention, the personality as a whole becomes pleasing and attractive.
How to practice Dhanurasana
This pose of Yoga Asana is called as Dhanurasana because it looks like an archer's bow. Hence it is also called as Bow Pose. The torso and legs represent the body of the bow and the arms represent the string. The Dhanurasana activates the abdomen and back muscles. First lie down in prone position on the mat with forehead touching the ground. Now bring your legs and heel together and bring the heels closer to your hip. Now hold the right ankle with right hand and the left ankle with left hand. If you are unable to do it, then hold the toes in place of ankles.
Lower your Blood Pressure by Yoga Practice
High blood pressure is one of the most prevailing ailments in the world right now which is affecting people of all ages. Yoga Asanas help to reduce Blood Pressure. There are some yoga asanas to reduce blood pressure. Some categories of asanas to reduce high blood pressure are forward bends, sitting, supine and inversion groups.
What is Bhujangasana
The Bhujangasana or the Cobra Pose is one of the very powerful backward bending Asana. This asana is very useful for people with lower back aches. This asana enlarges the chest and strengthens the arms and shoulders. It also helps to relieve stress. In this asana the body takes the position of cobra, raising its body and preparing to strike. There are huge benefits of the Cobra Pose or the Bhujangasana.
Friday, November 28, 2014
How to practice Dhyan mudra
How to pracice Makarasana - the Crocodile pose
The makarasana provides relaxation of the entire nervous system, body and mind. This asana gives extra relaxation to the back region. The asana removes the tensions and relaxes the muscles which lead to decrease in the demand for blood and oxygen.
It also reduces blood pressure.
Let us now see how to practice makarasana which is very useful for taking rest between asanas. Here is a step by step procedure to practice makarasana...
Step by step procedure for makarasana
- Lie down on your stomach, placing the legs with a comfortable distance apart and pointing the toes outwards. See the picture below.
- Now fold the arms in front of the body by resting the hands on the upper arms. Position the elbows and lower arms so that the chest does not touch the floor.
- Keep your eyes closed and pay attention to the breath and its effects around the abdominal area.
- While inhaling, feel the abdominal muscles gently press against the floor. While exhaling feel the abdominal pressure decrease. See the picture below.
The benefits of Makarasana
- The makarasana helps in relaxing the entire body.
- Completely relaxes the muscles and mind
- The problems of high blood pressure are relieved
- The makarasana is beneficial for treatment of mental disorders
- Heart diseases can be cured if you practice makarasana properly
Thursday, November 27, 2014
How to practice Tadagasana - the Pond Pose
Step by step practice of Tadagasana
- Take supine position ( sleeping position )
- Now bend knees, get heels close to hips.
- Keep the legs 1 to 1.5 foot apart.
- Cross arms around the head.
- Relax all your body, muscles and continue normal breathing while releasing slowly move legs to original position and hands to normal position
Benefits of Tadagasana
- Reduces stress and exertion
- Relaxes muscles and mind
Saturday, August 30, 2014
Shavasana - how to practice
The Shavasana got its name because the body looks like a dead body. The Shavasana is one of the easiest asanas to get into but the most difficult to practice. This is the best relaxation poses and if practiced properly with full efforts, can relax every body part, relaxing not only the body but also the mind. This article explains how to practice Shavasana.
- Allow the arms and legs to drop open while lying on the back with the arms about 45 degrees from the side of your body. Please make sure that you are comfortable.
- Now close the eyes and take slow deep breaths through the nose. Allow the whole body to become soft and heavy by relaxing on the floor. As the body is relaxed on the floor, feel the whole body rising and falling with each breath.
- Scan the body from the toes to the fingers to the crown of the head, looking for tension, tightness and contracted muscles. Consciously release and relax any areas that you find.
- Release all control of the breath, the mind and the body. Let your body move deeper and deeper into a state of total relaxation.
- Stay in Shavasana for at least 10 to 15 minutes
- To release, slowly deepen the breath, wiggle the fingers and toes, reach the arms over your head and stretch the whole body, exhale bend the knees into the chest and roll over to one side coming into a fetal position. When ready, slowly inhale up to a seated position.
Benefits of Shavasana
- This yoga posture brings a deep, meditative state of rest, which may help in the repair of tissues and cells, and in releasing stress. It also gives time for the yoga workout to sink in at a deeper level.
- This posture leaves you in a state of rejuvenation. It is the perfect way to end a yoga session, particularly if it has been a fast-paced one.
- Shavasana helps reduce blood pressure, anxiety, and insomnia.
- This asana is an excellent way to ground the body and reduce the Vata dosha(imbalance of the air element) in the body.
Thursday, August 21, 2014
Padangusthasana - The Big Toe pose
Steps to practice Padangusthasana
- Stand upright as in Tadasana with your feet parallel to each other. There should be at least six inches between the feet. Keep your legs straight.
- Now contract your thigh muscles, which will lift your knee caps outward.
- Keep the legs straight, and bend forward with an aim of touching your forehead to your knee. Your torso and head should move together.
- Once in this position, try to grip your big toes with fingers of each foot. Grip your toes firmly with your fingers
- Now press your toes into your hand. If you are unable to catch your toes with changing your posture, you can also use a band or a strap to hook under your toes and hold that instead.
- Now lift your torso and straighten your elbows as you inhale.
- Do this for as high as you can without stressing any other part like your neck ..
- Exhale when you release your torso and bend towards your toes again. Do this repeatedly.
- Now try to straighten as if going to starting position but holding your toes.
- Do this cycle of inhalation and exhalation few times increasing the stretch of the torso every time you stretch.
- Come back to the starting position by slowly releasing the band and straightening up.
Precaution
If you feel some stroppy pain in your spine or any part of your body, immediately stop doing it. If you suffer from lower back pain or any lumbar pain, this posture is not advisable to perform. If you have flat feet and week ankle, you must first take instruction from your trainer.
Benefits of Padangusthasana
- This asana is immensely helpful to improve flexibility of the whole body.
- This asana someway calms the body flow of blood and thus helps in reducing hypertension.
- This asana helps to stretch hamstring, calf muscles and thigh, and thus burn the fat and increase strength in these areas.
- Regular practice of this asana helps to relieve bowel movement and bloated feeling in the stomach.
- It helps to rejuvenate liver and spine and aims to balance the physical and mental aspect.
- This asana is recommended for people who are suffering from osteoporosis or likely to suffer from it. This posture gives strength to bones. It is experienced that this asana somehow helpful in insomnia.
Here is a video showing how to practice Padangusthasana
Saturday, July 26, 2014
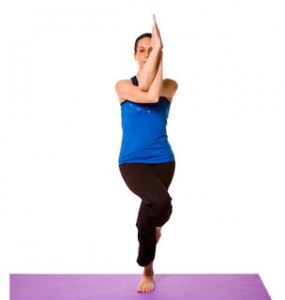
Garudasana - The Eagle Pose
Step by step practice of Garudasana
- First stand in Tadasana
- Now bend your knees slightly and lift your left foot up and balancing on your right foot, cross the left thigh over the right.
- Point your left toes towards the floor and press the foot back and then hook the top of the foot behind the lower right calf. Balance on the right foot.
- Now stretch your arms straight forward, parallel to the floor and spread your scapulas wide across the back of your torso. Cross the arms in front of your torso so that the right arm is above the left, then bend your elbows. Snug the right elbow into the crook of the left, and raise the fore arms perpendicular to the floor. The backs of your hands should be facing each other.
- Now press the right hand to the right and left hand to the left so that the palms are now facing each other. The thumb of the right hand should pass in front of the little finger of the left. Now press the palms together as much as possible. Lift the elbows up, and stretch the fingers towards the ceiling.
- Stay like this for 30 seconds and then unwind the legs and arms and stand in Tadasana again. Repeat the same thing with the legs and arms reversed.
This asana is very good for people suffering from asthma and low back ache. Some of the benefits of the Garudasana are listed below.
- Strengthens and stretches the ankles and calves
- stretches the thighs, hips, shoulders and upper back
- Improves the concentration
- Improves sense of balance
Friday, July 25, 2014
Sankatasana - Difficult Yoga pose
How to practice Sankatasana
- Stand in tadasana.
- Now bend the right leg slightly and shift the weight of the body onto the right leg.
- Now try to lift the left leg up by bending it slightly at the knee. The body is now balanced completely on the right leg.
- Now cross the left leg over the right leg and hook the top of the left foot behind the right calf.
- Raise the both hands above hand and wrap the same way as legs are wrapped.
- The upper body should be kept straight.
- Once the left leg is wrapped over the right, the right leg should be straightened in order to feel the strain on the left leg.
- Gaze forward at a fixed point to maintain balance.
- Remain in the position for atleast 30 seconds on each leg.
- Then release the hands from twisted pose and return the arms to the side of the body.
- Release the left leg and bring the left foot back onto the ground to standing position.
Caution :
People suffering from arthiritis should perform this asana under expert guidance.
It may be slightly difficult initially for the beginners to wrap one leg around the other leg fully. Bending the right leg more would allow the left leg to be more easily wrapped around it.
If you do not have knee pain, you can repeat the same on the other side.
The duration of the asana should be at least 30 seconds on each side.