Sunday, March 2, 2014

Ushtrasana - Camel pose steps and benefits

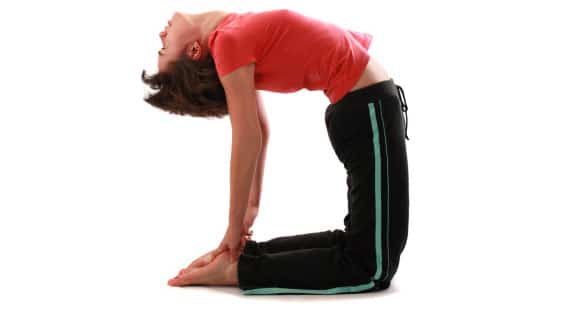
Ushtrasana also known as camel pose.  In Sanskrit 'ushtra' means Camel.  The body looks like the shape of camel while doing this asana, so it is called as Ushtrasana.  The Ushtrasana is very good for back problems, relaxing mind, blood circulation, respiratory system, endocryne and nervous system.  

The Ushtrasana is a popular intermediate back bend which has strong effect on chest and upper back.  Let us now see how to practice Ushtrasana.  Here is a step by step procedure to perform Ushtrasana.

Here is a video showing how to perform Ushtrasana.


Uttanpadasana - Leg raised yoga pose and its benefits

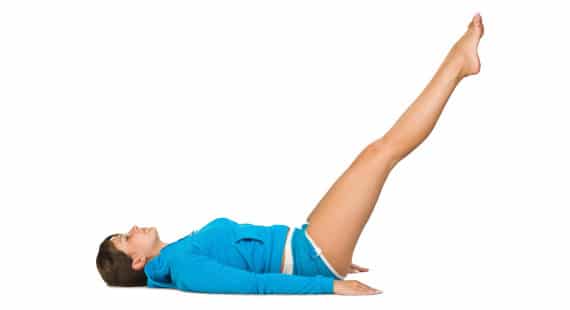
The Uttanpadasana also called as Raised Foot Pose is one of the classic pose which is performed in the supine position.  The meaning of 'ut' is to lift, 'tan' is to stretch and 'pad' means leg.  This pose involves raising the legs and is used as an exercise to reduce and tone the belly.  The Uttanpadasana also called as Dwipadasana as 'dwi' means two and 'pada' means legs.

The Uttanpadasana or the raised leg pose is very useful for those having back pain and stomach disorder. People who want to have a flat stomach can practice this yoga asana.  This asana is very good for strengthening abdominal muscles.  You can also practice this asana by raising one leg at a time also.  Here are the step by step instructions to practice Uttanpadasana.


Steps to practice Uttanpadasana

  • Begin this pose by coming to a supine position with your back on the ground as shown in the image above.
  • Both your feet and knees should be kept together and your breathing should be normal. 
  • While breathing out, let your back arch by lifting your chin up and turning your head back till the crown of your head is on the floor. You can use your hands to move your head backward if necessary. Keep your arms at your sides and breathe normally.
  • Now stretch your back and take a deep breath. Then simultaneously lift both your legs to a 50-degree angle from the ground.
  • Hold this posture for some time ( 15 to 20 seconds)  to feel pressure in lower abs.
  • Now lift your arms up and keep them parallel to the ground and above your torso. Make sure that both your legs and arms are kept straight and not bent at the elbows or knees. Continue breathing normally. At this point only the crown of your head and your buttocks will bear the weight of your body.
  • To get out of this pose take a deep breath and bring both your legs and arms down to the ground. Bring your back down to the floor, make your body straight and relax. Rest for a little while and repeat the steps. You can practice five rounds of this pose.


Precautions for Uttanpadasana

  • Pregnant women should avoid Uttanpadasana for first few months. They should consult a doctor before practicing this asana in the third trimester.  Can take the support of wall while practicing.
  • People suffering from high blood pressure, slip disc, ulcer or abdominal surgery should not do this asana
  • Practice of this asana should be done under expert guidance.  
  • People recovering from an injury to the spine should perform this asana by lifting one leg at a time. The reason for this is that lifting both legs would put much strain on the spine.
  • Do not practice this asana more than 5 times a day.

Benefits of Uttanpadasana

Here are some of the benefits of practicing Uttanpadasana.
  • This asana cures stomach dosorders like indigestion, acidity or constipation
  • The asana strengthens the abdominal organs
  • Back and thigh muscles get strengthened
  • This asana is helpful for those suffering from gas problems, acidity, arthritis pain, heart problems and waist pain.,
  • The asana cures back pain
  • Reduces stomach and tones the stomach muscles
  • Useful for loosing weight
  • Good asana for diabetic patients
  • Digestive system is improved
  • Gases are removed from intestine
  • reduces weight in abdominal area, thighs and hips
  • Excellent asana for 6 pack abs

Here is a video showing how to practice Uttanpadasana

Datta Mudra - How to practice

Yoga is believed to be as old as civilization but some scholars have traced it back to 3000 B.C.  Dattamudra is an asana for the beginner.  In this article, you will learn how to practice Datta Mudra.

How to practice Datta Mudra

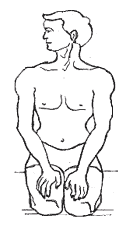
  • In this Dattamudra position, one need to be seated in Vajrasana Position. 
  • Fold legs inwards from the knees and sit straight in that position.  Hold your head high and rest your palms on the knees.
  • In the Vajrasana position, turn your neck to the left side as much as possible, relax all the muscles and continue normal breathing.
  • Repeat the same by turning your neck to the right side. 
  • That is all.  You need to turn your neck to left side and then to the right side in Vajrasana Position.

Benefits of Datta Mudra

The Datta Mudra is very much useful in reducing stress and anxiety.  This is because it relaxes the body muscles, giving proper stretch to neck and back.

Thursday, December 19, 2013

Ardhamatsyendrasana - How to practice

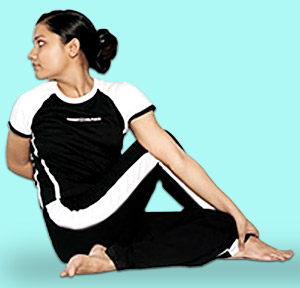
It is very essential to keep the spine healthy for staying alert and energetic in later years.  So a healthy spine is not only desirable but is the most valuable for your journey to enlightenment.  So most of the yoga asanas are devoted to keeping the spine healthy.   The "Ardha Matsyendrasana" or the "Lord of the fish pose" is a wonderful rejuvenator of the spine and abdominal organs.  You can feel the refreshing effect almost immediately.

The Ardha Matsyendrasana also known as "Seated half spinal twist pose" whose name is derived from the great yoga saint named Sage Matsyndra.  Also "Matsya" translates to a "fish" in Sanskrit.  If you practice this posture daily, it will improve your body posture.

The Twisting poses are very important in yoga classes because they provide a lot of benfits for the entire body.  Twists increase the flexibility of the spine, calm the mind, relax the nervous system and improves digestion.  The Ardha Matsyendrasana is a popular seated twist.

Its Sanskrit name, "Ardha Matsyendrasana" (ARD-uh MAHT-see-ehn-DRAHS-uh-nuh), comes from four words:

  • "Ardha" — meaning "half"
  • "Matsya" — meaning "fish"
  • "Indra" — meaning "ruler"
  • "Asana" — meaning "pose"

This asana is named after Matsyendra, who is a yoga master in India.  Practicing this twist brings many benefits to your body, mind and spirit.

How to practice Ardha Matsyendrasana


  • First start by sitting on the floor with your legs extended in front of you and arms resting at your sides.  This pose is called as Dandasana.  You can see this pose in the following picture.
  •  Now bend both of your knees, placing the soles of your feet flat on the floor.  Now drop your left knee to the floor.  Tuck your left foot under your right leg, resting it alongside, your right buttock.
  • Raise your left arm on an inhalation.  Twist to the right on exhaling, with your torso against the inside of your right thigh.  Place your left elbow to the outside of your right knee.  Now keep your fore arm raised, with your fingertips pointing towards ceiling.  To deepen the pose, lower the left forearm and hold onto the left knee. Reach behind your body with your right hand and rest it on the floor behind you.
  •  Spiral your torso around your spine from your tailbone to the crown of your head.
  • With each inhalation, make your spine longer; and with each exhalation, twist a little deeper.
  • Turn your head to gaze over your right shoulder.
  • Press your inner right foot firmly into the floor. Keep the front of your torso long. Draw your tailbone down to the floor.
  • Hold for up to one minute.
  • To release, exhale and unwind your torso. Come back to center and extend both legs in front of you in Staff Pose again. Repeat the twist for the same length of time on the opposite side.

Cautions

Avoid practicing this pose if you have a recent or chronic injury to your knees, hips, or spine. Those with back pain, back injuries, or degenerative disk disease should approach this pose with caution and should only attempt to practice it under the guidance of an experienced and knowledgeable instructor. Always work within your own range of limits and abilities. If you have any medical concerns, talk with your doctor before practicing yoga.

Benefits of Half Lord of the Fishes Pose

Traditional yoga texts claim that this pose destroys deadly diseases and awakens the cosmic energy called "Kundalini." Modern teachers agree to its many benefits, which include:

  • Stretched shoulders, hips, neck, and spine
  • Relief from fatigue, backache, and sciatica
  • Stimulated digestion and metabolism
  • Stimulated kidneys and liver
  • Relief form menstrual discomfort
This pose energizes the body, and calms the mind and nervous system. It is also therapeutic for asthma and infertility. As with all twists in yoga, Ardha Matsyendrasana relieves stress and restores balance to body, mind, and spirit.


Friday, December 13, 2013

How to practice Vakrasana

This asana is called as Vakrasana or Twisted Pose because the spine is twisted in practicing this asana.  "Vakra" means 'twisted' in Sanskrit.  In the Vakrasana, the upper part of the body is completely turned and twisted.  The spine, the muscles of hands, the legs and the back are stretched.
  
The Vakrasana is a simplified form of the Ardha Matsyendrasana, an asana which is named after Matsyendranath, the founder of Hatha yoga.  The asana stretches the thigh and tones the abdomen.  Those who are unable to perform Artha Matsyendrasana generally prepare for it by practicing the Vakrasana.  Now let us see how to practice Vakrasana.


How to practice Vakrasana

Here is a step by step way to practice Vakrasana.  
  • Sit erect first, stretching the legs in front together
  • Hands should be by the side, palm resting on the ground, fingers together pointing forward
  • Now slowly fold left leg at the knee and place the sole on the ground near the knee of right leg.  The knee of the left leg should make 90 degrees angle straight towards sky
  • Now take left hand towards back, place the palm on the ground straight from the spine.  Fingers should be together points backward
  • Now place the right hand towards the other side of the left knee.  If the legs are stretched towards east then fingers of the hand will point towards north
  • You have to twist the head back towards backside and try to look back
  • While returning to the original position, first bring the head towards original position
  • Now take the right hand to its original position and then bring the left hand from the back and place it by the side of the body.
  • Slowly stretch out the folded leg and sit erect as in first position
  • Practice the asana in the same way with the other leg.  This makes one round of Vakrasana
 Even though this asana is easy to practice,  most people find it difficult to place the hand to the other side of the knee.  If it is difficult, then you can place the hand on the knee or keep it where ever it is. 

This asana should be retained for at least two minutes on each side.

Benefits of Vakrasana

 Vakrasana is a very good asana to make the spine flexible.  The Vakrasana is very much helpful in treating enlarged and congested liver and inactive kidneys.  This asana also brings relief to hypertension, constipation and diabetic patients.  Here is a list of benefits of Vakrasana.
  • Vakrasana cures constipation, liver weakness and nervous weakness.
  • The asana reduces rigidity in the spine
  • Very useful for kidneys and other stomach diseases
  • Kundalini shakthi is sublimated
  • The asana reduced back aches
  • The spine attains elasticity
  • Flab on the lateral side of the abdomen gets reduced

Caution :

Those people with big belly may feel it difficult to place the hand to the other side of the knee. They are suggested to place the hand on the knee or keep it wherever it is, if it is not possible to place it on the ground. 

Here is a video on how to practice Vakrasana...


Monday, November 25, 2013

How to practice Trikonasana

Trikonasana also called as Triangle pose augments the movement of half spinal twist and gives an excellent stretch to the spine and helps in proper functioning of the digestive system.


The Trikonasana is normally performed in two parts - facing left and then facing right.  The person begins the asana by standing with the feet one leg-length apart, knees unbent, turns right foot completely to the outside and the left foot less than 45 degrees to the inside, keeping the heels in line with the hips.  The asana is pronounced as Tree-kone-ahs-ana.  Unlike the other yoga postures, the Triangle pose requires you to keep your eyes open in order to maintain the body balance.  We close the eyes in other asanas.   Now let us see how to perform Trikonasana or the Triangle pose.


How to do Trikonasana

Here is a step by step procedure to perform Trikonasana
  • Stand straight and separate your feet comfortably wide apart ( about 4 feet)
  • Now turn your right foot out 90 degrees and left foot in by 15 degrees
  • Then align your center of right heel with the center of your arch of left foot
  • You need to ensure that your feet are pressing the ground and weight of your body is balanced equally on both of your feet
  • Now inhale deeply and as you exhale, bend your body to the right, downward from the hips, keeping the waist straight, allowing your left hand to come up in the air while your right hand comes down towards the floor.  Keep both of the hands in straight line
  • Rest your right hand on your shin, ankle, or the floor outside your right foot, without distorting the sides of the waist. Stretch your left arm towards the ceiling, in line with the tops of your shoulders.  Keep your head in a neutral position or turn it to the left, eyes gazing softly at the left palm
  • Make sure that your body is bent sideways and not backward or forward.  Pelvis and chest are wide open.
  • Stretch maximum and be steady.  Keep taking long and deep breaths.  Relax your body more and more with each exhalation.
  • As you inhale, come up, bring your arms down to your sides and straighten your feet
  • Repeat the same on the other side

 Benefits of the Triangle Pose (Trikonasana)
  • Strengthens the legs, knees, ankles, arms, and chest
  • Stretches and opens the hips, groins, hamstrings, and calves; shoulders, chest, and spine
  • Increases mental and physical equilibrium
  • Improves digestion
  • Reduces anxiety, back pain and stress

Here is a video which shows how to practice Trikonasana


Sunday, November 24, 2013

Sleeping Vishnu Pose - Ananthasana

Ananthasana also called as Sleeping Vishnu pose looks to be easy at first glance.  But it takes strength, flexibility and finely honed balance to retain softness and calm in the pose.

Anantha is the nickname of the Hindu deity Lord Vishnu.  This asana also called as side reclining leg lift pose is a core balancing pose which concentrates on the pelvic region.  Regular practice of this asana helps in toning the abdominal muscles and also strengthens and stretches the sides of the body and back of the legs.  Here is a step by step procedure to perform Anantasana.


Steps to perform Anantasana

  • Lie down on a mat, preferably on your left side and be steady in this position by pressing the heels and the outer part of the left foot firmly into the floor.
  • Now raise your right arm and straight out along the floor and directly above your head.  Your right arm should be 90 degree angle to your body.
  • Lift your head off the floor and support it with the palm of your left arm.
  • Rest the right arm on the side of your body and maintain balance.
  • In the next step, bend your right leg at the knee, reach towards the big toe and grab it with the thumb and first two fingers of the right hand.
  • Hold this position and maintain balance.
  • Proceed by exhaling and stretching the right leg towards the ceiling. If you find it difficult to extend the leg completely, try to hold the foot with the help of a belt.
  • Hold this position for a few breaths and then release slowly.
  • You can repeat the same sequence of the side-reclining leg lift steps for the other side of your body and hold the position for the same amount of time. 


Even though this asana has good health benefits, the side-reclining leg lift asana needs some precautions for some people suffering from conditions like Sciatica, slipped disc and cervical spondilitis.  People with these problems should completely refrain from this asana or do it under professional supervision.

Benefits of Anantasana:

  • Anantasana helps in toning the abdominal muscles.
  • It stretches and strengthens the sides of the torso.
  • The asana increases the flexibility of the spine and muscles in the legs.
  • The hamstrings are stretched and strengthened, which increases their efficiency.
  • It reduces the obesity of the hips and thighs through the stretching action.
  • It promotes better blood circulation in the leg muscles.
  • It also helps in the development of the pelvic region.
  • It helps prevent problems like hernia by toning muscles.
  • It also helps in improving overall body balance. 
  • Regular practice relieves physical as well as mental fatigue.

Here is a video on how to perform Ananthasana or Vishnu pose.   See the video below.

 
Design by Free WordPress Themes | Bloggerized by Lasantha - Premium Blogger Themes | Justin Bieber, Gold Price in India