Sunday, March 30, 2014

Bakasana - The crane pose

The Bakasana also known as crane pose in Yoga is a good arm balancing pose which helps in strengthening the arms and also abdominal organs.  The spine stretches to its full length and thus increase its flexibility by practicing this asana regularly.


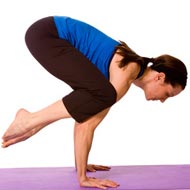
Bakasana helps in strengthening the arms, shoulders, and joints and develops a better concentration and balance.  Let us now see the steps to practice Bakasana.

How to practice Bakasana

  • Squat down from Tadasana  with your inner feet few inches apart.  
  • Keep the feet flat on the yoga mat.  Now place the palms in between the knees and flat on the ground while maintaining the knees and elbows at the same level.
  • Now bend the torso forward while lifting both legs up in such a way that the whole body balances on the palms.  Maintain a straight gaze while in this pose and see that the body balances properly.
  • Stay in this pose for 30 seconds to 1 minute
  • slowly bring the feet down on to the ground and go back into the Tadasana pose to return to the original posture.
Caution : 
  1. Always try to keep the neck straight in this posture to avoid strain.
  2. People suffering from neck problems should practice this asana under a trained yoga expert
  3.  Pregnant women should not practice this asana


Benefits of Bakasana

  • Strengthens the abdominal muscles and arms and wrists
  • Strengthens the upper back
  • Improves the concentration
  • imporves self confidence
  • Improves flexibility of spine


Utkatasana -

It may be very easy and comfortable to sit on a chair,  but sitting on an imaginary chair may be a bit difficult!  And this is exactly what we do in Utkatasana or the chair pose.  The meaning of Utkatasana is intense posture or a powerful posture.


(Utkat=Intense, Powerful; Asana= Posture/Pose; pronounced as U-t-kat- asana).


The utkatasana strengthens the thighs and ankles while toning the shoulders, buttocks and hips.
This asana also stretches the shoulders and opens the chest.  The Utkatasana also tones up the digestive organs and the heart.  The heart beat rate increases by holding this pose for several breathes there by stimulating the circulatory and metabolic systems.  The asana builds stamina and tones up the nervous system.

Caution :  
Do not practice Utkatasana if you are suffering head aches, low blood pressure or insomnia.  

How to practice Utkatasana

  • Start in Tadasana ( mountain pose )Stand with your feet together.
  • Inhale while raising your arms above your head, perpendicular to the floor.
  • Either keep the arms parallel, palms facing inward or join the palms.
  • Now exhale and bend your knees, try to take the thighs as nearly parallel to the floor.  The knees should project out over the feet and the torso will lean forward over the thighs until the front torso forms a right angle with the tops of the thighs.  Keep the inner thighs parallel to each other and press the heads of the thigh bones down towards the heels
  • Firm your shoulder blades against the back.  Take the tail bone down towards the floor and in toward your pubis to keep the lower back long
  •  Stay in this pose for 30 seconds or even more time.
  • In order to come out of this pose, staraighten the knees with an inhalation, lifting strongly through the arms.  Exhale and release your arms to your sides and come back to  Tadasana.


Benefits of Utkatasana
  • The Utkatasana strengthens and firms all muscles of the legs and upper arms
  • Helps to strengthen the lower back and torso
  • Increases the hip flexibility and relieves muscular cramps
  • balances the body
  • Tones the thigh, ankle, leg and knee muscles
  • Heals chronic cold feet
  • cures slipped discs and other problems of lower spine


 Here is a video on how to practice Utkatasana


Cofit Treadmil Mat

Are you having a treadmill?  One of the important accessory which you need for your new treadmill is a good treadmill mat.  A treadmill normally vibrates while using it and it produces a loud noise and constant vibrations as it is sitting directly on the floor.  So you need to use a proper treadmill mat under them.  These mats will maintain the floors and carpets and minimizes the vibrations and also reduce the annoying noises produced by using treadmill.

The treadmill mats are relatively cheap compared to the headache and money which can be saved in the long term if they are not used.    The Cofit Treadmill mat is available from www.flipkart.com website for a price of just Rs.1840.  This mat from Cofit reduces the vibrations and static generated from treadmills.  The mat is made from PVC material.   Some of the important features of this Cofit treadmill mats are listed below.

Key Features
  • Effectively Reduces Vibrations and Static
  • PVC Treadmill Mat
  • Absorbs Impact of Machine on Floors

PVC Treadmill Mat 

This mat from Cofit is made of PVC material so it provides the correct grip and support and does not move even on smoothest of floors.  The mat absorbs the impact of treadmill on the floors.  So whenever you run on your treadmill, the mat will absorb the impact of the machine and protects the floor from damage.


How to buy

The Cofit Treadmill mat  can be purchased from www.flipkart.com website for a price of Rs.1840 inclusive of taxes.  The price is inclusive of all the taxes.   The actual price of this treadmill  mat is Rs.2300  where as there is a 20% discount from this website and you get the Yoga mat for just Rs.1840.  The website offers a free home delivery.   If you want to buy this item,  please follow the instructions given below.
  • Visit the Cofit treadmill mat page on Flipkart website.
  • On the above page, click on "Buy Now" button
  • Fill up the details and make the payment.
  • Once you make the payment,  the item will be delivered to your door step by courier.
  • Cash on delivery facility is also available 
  • 30 day replacement guarantee is also available
 The Cofit Treadmill mat is 7.7 Kg in weight and its dimensions are 2.0 mtr  x 1.00 mtr  x 6 mm.


Iso Solid PVC Yoga Yoga Mat for Rs.702

ISO SOLID is one of the pioneer company in India supplying fitness equipments for many years.  The company offers a variety of high quality gym and fitness equipments and materials like Treadmills, Ellipticals, Exercise Bikes and other items.   


The PVC Yoga mat from ISO Solid is one such item from the company which is available for a price of Rs.702.  The Yoga mat from ISO solid is 6 mm thick and available in blue and pink colors.  The yoga mat is made from Poly Vynyl Chloride ( PVC) material and the filling material is foam.  The yoga mat offers excellent comfort while practicing variety of yoga asanas.  The mat is available for a price of Rs. 702 from www.flipkart.com website.

 The ISO Solid  PVC Yoga mat  is durable and light weight.  The mat is also very convenient and comfortable while using it.  


How to buy

The ISO Solid Yoga mat   can be purchased from www.flipkart.com website for a price of Rs.702 inclusive of taxes.  The price is inclusive of all the taxes.   The actual price of this Yoga mat is Rs.936  where as there is a 25% discount from this website and you get the Yoga mat for just Rs.702.  The website offers a free home delivery.   If you want to buy this item,  please follow the instructions given below.
  • Visit the ISO SOLID Yoga mat page on Flipkart website.
  • On the above page, click on "Buy Now" button
  • Fill up the details and make the payment.
  • Once you make the payment,  the item will be delivered to your door step by courier.
  • Cash on delivery facility is also available 
  • 30 day replacement guarantee is also available

Nivia AB3618 Yoga Mat

NIVIA is one of the India's leading sports brand.  The company is India's leading manufacturer of sports equipment, sports foot wear and other accessories. 

The Nivia AB3618 Yoga mat provides a very good comfort for yoga practitioners.  If you want to practice all the complicated or simple Yoga Asanas with great comfort, then you should select Nivia yoga mats for your yoga sessions.  These yoga mats from Nivia are designed from slip resistant material, and offer a soft, firm and even surface.  The mat also offers insulation from cool floors.  This mat is also machine-washable. 

Now in this article I will describe a kind of Yoga mat which is available for a price of Rs.1575 from www.flipkart.com website.

 The Nivia AB3618 Yoga mat is durable and light weight.  The mat is also very convenient and comfortable while using it.  


How to buy

The Nivia AB3618  Yoga mat   can be purchased from www.flipkart.com website for a price of Rs.1575 inclusive of taxes.  The price is inclusive of all the taxes.   The actual price of this Yoga mat is Rs.2100  where as there is a 25% discount from this website and you get the Yoga mat for just Rs.1575.  The website offers a free home delivery.   If you want to buy this item,  please follow the instructions given below.


  • Visit the Nivia AB3618 page on Flipkart website.
  • On the above page, click on "Buy Now" button
  • Fill up the details and make the payment.
  • Once you make the payment,  the item will be delivered to your door step by courier.
  • Cash on delivery facility is also available 
  • 30 day replacement guarantee is also available

The dimensions of this yoga mat are 61 cm (width )  x  173 cm ( length ) and thickness is 4 mm.

Buy Silver's Yoga Mat for just Rs.518

If you are practicing Yoga poses and Yoga asanas, it is very much essential to practice them using a Yoga mat.  In the olden days, yoga practice in India was being done on kusha grass or on a rug of deer or tiger skin.  Now it is very difficult to get a deer or tiger skin or that kind of rugs, they are not used in recent time.

Many people in the western countries used towels or cotton mats on wooden floors for practicing yoga.  Later on rubber mats were introduced in order to prevent cotton mats from slipping on wooden floors. 

So the Yoga Mats are some specially fabricated mats used to help us during the practice of yoga asanas to prevent hands and feet from slipping during the practice of yoga asanas.  These yoga mats are also called as non-slip mats or sticky mats. Now in this article I will describe a kind of Yoga mat which is available for a price of Rs.518 from www.flipkart.com website.

 The Silver's Yoga mat is durable and light weight.  The mat is also very convenient and comfortable while using it.   It has an excellent textured surface.  The Silver's yoga mat provides you a perfect grip and support whether you are practicing a complicated yoga asana or just simple pranayama.

How to buy

The Silver's Yoga mat   can be purchased from www.flipkart.com website for a price of Rs.518 inclusive of taxes.  The price is inclusive of all the taxes.    The website offers a free home delivery.   If you want to buy this item,  please follow the instructions given below.
  • Visit the Silver's Yoga Mat page on Flipkart website.
  • On the above page, click on "Buy Now" button
  • Fill up the details and make the payment.
  • Once you make the payment,  the item will be delivered to your door step by courier.
  • Cash on delivery facility is also available 
  • 30 day replacement guarantee is also available
This yoga mat is suitable for juniors and seniors.  The dimensions of the Silver's yoga mat are 61 cm  (width)  X  173 cm length).

Sunday, March 23, 2014

Tolangulasana - Weighing Scale Pose

 The meaning of "Tolungul" in Sanskrit is 'Weighing Balance'.  The body posture is balanced on your waist in this posture and resembles a weighing balance.  So this pose is also called as weighing balance pose.   Let us now see how to practice Tolangulasana.

How to practice Tolangulasana

Taking the Asana Position :   Initial position is Padmasana

  • Sit erect on the floor and assume Padmasana.
  • From Padmasana, take your arms back and rest the elbows on the ground
  •  Len back gradually taking support of your elbows till you lie on your back
  • Form fists with the hands and place the fists ( Palms facing down) under the buttocks
  •  Exhale and while inhaling, lift the padmasana at 45 degrees to the ground, balancing the body on the fists and lower arms.  breathe normally. 
  • Remain in this posture as long as you can.
 The Asana position : In this position, the weight of the upper body is supported by the arms.  Abdominal strength is required to lift the padmasana. The spine remains straight and the head should be held erect, with the eyes looking in forward direction.
    

How to release the asana position:
  •  Inhale and while exhaling, slowly release the padmasana to the ground
  • While inhaling, lift the back up vertically with the support of hands
  • Place the hands back in dhyanmudra on the knees, coming back to padmasana
    Caution :  If you have pain in neck or back,  please do not practice this pose.

Benefits of Tolangulasana:

  • The spinal column becomes flexible and toned.
  • Diabetes and piles patients can get relief with this yoga pose.
  • Blood circulation improves.
  • The biceps and back muscles strengthen and get toned.
  • This pose improves digestion and can cure flatulence.


Monday, March 17, 2014

Hansasana - How to practice

The entire body is in a straight line at an angle to the ground with only the toes and hands
touching the ground in the Hasasana.  The final posture in hansasana looks like the form of a swan, hence the name Hansasana.  Hansa means the swan.  The person has to balance the whole body on both the palms in this asana.  The feet and hand muscles become strong by practicing this asana. The chest also becomes strong and powerful.  This asana reduces the fatness  of the neck.  Let us see how to practice hansasana.


How to practice Hansasana

Initial Position - Sitting Position
  • Bend the legs one after the other and come on to the feet in a squat.
  • Rest the knees on the ground
  • Spread the knees apart and place the hands on the ground about 3 to 4 inches apart, with the fingers pointing towards the feet. Bend and touch the elbows together and lean the upper body forward so that the abdomen is resting on the elbows and the chest is resting on the upper arms.
  • Stretch the legs backward until they are straight.  The feet should be together, with only the tips of the  toes touching the ground
  • Roll the shoulders back and raise the head slightly so that the head, neck, shoulders, back and legs form a straight line at an angle to the ground. Breathe normally.

The asana position

In this position, the entire body is kept  in a straight line with the most of the weight on the elbows that are pressing onto the abdomen.  The wrists are kept about 3 to 4 inches apart, which helps in balancing the body. The feet should be kept together, with only the tips of the toes touching the ground.


Releasing the Asana position

  • Hunch the upper body slightly by bending the neck and the shoulders forward.
  • Slowly step the feet one after the other forward. Straighten the arms and come into a squat.
  • Place the arms by the side of the body, straighten out the legs and come back into the sitting position.


Sunday, March 16, 2014

Kashyapasana - how to practice

The Kashyapasana  is dedicated to sage kashyapa, son of the sage Marichi, a son of Brahma.
Here is a step by step method to practice Kashyapasana.


Step by Step practice of Kashyapasana


Step 1 : Come into the side plank position.

Step 2 : Roll over the body to the left side

Step 3 : Keep the body straight and balanced with the left hand on the ground

Step 4 : Bend the right leg in the knee and keep the right foot on left thigh

Step 5 ; Grab the right toe with the right hand after encircling the right hand around the waist.  Balance the position and also try from the other side


Vasisthasana - how to practice

Vasistha means most  excellentVasistha is the name of one of the well known sages in yoga tradition.  The full version of Vasisthasana as taught by BKS Iyenger with the top leg raised perpendicular to the floor is very difficult for most of the beginners, so the pose described in this article is a modified version suitable for all levels. 


Step by step process of performing Vasisthasana

  • First perform Adho Mukha svanasana as described in this page..  Shift onto the outside edge of your left foot, and stack your right foot on top of the left.  Now swing your right hand onto your right hip, turn your torso to the right as you do, and support the weight of your body on the outer left foot and left hand
  • Now make sure that the supporting hand is not directly below its shoulder.  position the hand slightly in front of its shoulder, so that the supporting arm is angled a bit relative to the floor.  Straighten the arm by firming the triceps muscle, and press the base of the index finger firmly against the floor.
  • Strengthen the thighs, and press through the heels toward the floor.  Align your entire body into one long diagonal line from the heels to the crown
  • You can stretch the top arm towards the ceiling if you want, parallel to the line of shoulders.  Keep the head in a neutral position, or turn it to gaze up at the top hand
  • Stay in this position for 15 to 30 seconds.  Come back to Adho Mukha svanasana, take a few breaths, and repeat to the right side for the same length of time. 


Benefits of Vasistasana– This posture strengthens the wrists, arms, abdominal muscles and legs. The spine is lengthened and toned and balance is improved.  This also expands the chest, improving the functioning of your respiratory system.

Here is a video showing how to practice Vashisthasana

Fusion Yoga - Movie DVD for just Rs.295

This DVD is sequence of strength buildings poses derived from yoga and martial arts to help prepare the body from inner awareness by stimulating the breath through challenging poses and movements.


Physical muscular activation helps to deepen and energise our breathing capacity which helps to neutralise our nerve impulses. This creates a peaceful state of mind which leads to a beautiful life arount us ... inner balance through physical strength external beauty through a change in inner perceptions!

This DVD will help tone the body even with just a few sessions of practise and also calm the mind and improve the immunity and endurance.  The running time of the DVD is approximately 30 minutes.

The DVD is available for a price of Rs.295  inclusive of taxes.  You need to pay Rs.40 as delivery charges.  The DVD is available online at www.flipkart.com website.   


How to buy?

The DVD "Fusion Yoga"   can be purchased from www.flipkart.com website for a price of Rs.295 inclusive of taxes.  The price is inclusive of all the taxes.    You need to pay additional Rs.40 as delivery charges.     If you want to buy this item,  please follow the instructions given below.
  • Visit the Fusion Yoga - Movie DVD page on Flipkart website.
  • On the above page, click on "Buy Now" button
  • Fill up the details and make the payment.
  • Once you make the payment,  the item will be delivered to your door step by courier.
  • Cash on delivery facility is also available


Yoga as Medicine - eBook on yoga for just Rs.1024

 "Yoga as Medicine ( The yogic prescription for health and healing )"  is an e-Book on Yoga techniques.  This book explains various yoga methods to help, prevent and heal the common ailments of today.  

The e-Book "Yoga as medicine"  is available instantly for a price of Rs.1,024  from www.flipkart.com website where as its original price is Rs.1,365.  Flipkart is offering a discount of 24% on the actual price of the book.

If you want to buy this e-Book "Yoga as Medicine",  please follow the instructions given below.

How to buy the eBook

The eBook   "Yoga as Medicine"   can be purchased from www.flipkart.com website for a price of Rs.1024 inclusive of taxes.  The price is inclusive of all the taxes.  The original price of the eBook is Rs.1365 but the website offers a discount of 24% and you get the eBook for just Rs. 1024.     If you want to buy this item,  please follow the instructions given below.
  • Visit the Yoga as Medicine   page on Flipkart website.
  • On the above page, click on "Buy Now" button
  • Fill up the details and make the payment.
  • Once you make the payment,  the item can be downloaded immediately to your computer.
  •  You can also read a sample pages before purchasing the eBook

Saturday, March 15, 2014

Chakras - the psychic centers of Yoga and Tantra

Prana is the vital life force of God which exists all over the universe.  "Prana" in Sanskrit  means "breath".  In vedic texts, prans is recognized as the energy of spiritual light.   Prana is the food that builds the soul body as it draws energy directly from God.   


Prana-yama is the technique of breathing prana through controlled breathing.  Prana is an ancient word which was used in the east for the energy / spirit of God.  The problem with us is the lack of awareness beyond our five physical senses and Prana which is of etheric nature takes a semi-dormant state of existence for us, mostly because of dormant sixth sense.  If you breath like you normally do, you only breath oxygen and not prana.  You have to let prana come within you through meditation as it is you consciously willing God to become a part of you.

Your physical body is interwined with our subtle energy body.  This subtle energy body comprises partly of one's soul energy and the energy gathered from your surroundings and through consumption of food.   Your soul energy is housed within this energy field which will be released upon death when this energy barrier weakens and ceases to exist.  Energy can never be destroyed but it can be transformed.  when various energy paths criss crosses one another, it creates an energy vortex or energy center called as Chakra.


Chakra means a wheel or a disc, which is a terminology used for the energy vortices spinning in the body.   These chakras are formed by vital energy pathways criss-crossing each other and it is this vital energy that forms our subtle energy.  Try to see these chakra points as electric sockets to feed our dimensional body when meditating with prana.

When you medidate on these chakras, it fuels them by harnessing Prana energy.  Prana tends to move from one chakra to another chakra.  Using this prana energy, you can expend them as you will, you can often use it to heal yourself or others,

So if you want to know more about these Chakras.. please buy a DVD titled "Chakras - the psychic centers of Yoga and Tantra" which is a 80-minute compilation which explains in details about the important chakras or the energy vortices.....     The DVD is available for a price of Rs.350 in India.  You need to pay additional Rs.40 as delivery charges...    

To know more about this DVD,  please read about Chakras - the psychic centers of yoga and tantra.

Learn Yoga Practice with a set of 5 DVDs - Yoga for Body Slim

 It is very much essential in the modern world for a person to be physically fit and healthy and keep away from the daily stress.  This is possible with practice of yoga every day.  This needs one to practice the right kind of exercise.  The "Yoga for Body Slim"  is an excellent collection of a set of 5 DVDs compilation in which you will have every thing needed to make your body slim by practicing Yoga and keep yourself fit.  Fitness instructor Jillian Michaels will show you the most useful work out routines in yoga to keep you physically and mentally fit.


The set of DVDs are available for a price of just Rs.699.  

How to buy the DVDs


The set of 5 DVDs  "Yoga for Body Slim"   can be purchased from www.flipkart.com website for a price of Rs.699 inclusive of taxes.  The price is inclusive of all the taxes.  The original price of the DVD set is Rs.999 but the website offers a discount of 30% and you get the DVDs for jusr Rs. 699.     If you want to buy this item,  please follow the instructions given below.
  • Visit the Yoga for Body Slim - Set of 5 DVDs page on Flipkart website.
  • On the above page, click on "Buy Now" button
  • Fill up the details and make the payment.
  • Once you make the payment,  the item will be delivered to your door step by courier.
  • Cash on delivery facility is also available 
  • 30 day replacement guarantee is also available
 

Tuesday, March 11, 2014

How to practice Tadasana - Mountain Pose

Tadasana or the Mountain Pose is one of the most basic of all yoga poses for beginners.  The Tadasana is normally the first post taught in yoga classes and fitness centers.  When you are performing a series of yoga positions, you normally begin with this Tadasana.

The Tadasana or the mountain pose stretches out the muscles..  The best time to perform this pose is when you feel your yoga session has turned a little to intense.  If you perform the mountain pose in between a series of yoga asanas helps you to rest your body and gives time to recover.  It also helps to gain concentration.   Here is a step by step method on how to perform Tadasana.


Steps to perform Tadasana


  • Step 1: Stand straight keeping your feet flat on the ground with your heels slightly apart. The bases of your big toes should be touching. Distribute your weight evenly between both of your feet. You can achieve this by lifting and spreading your toes.. Repeat this till you feel that your weight is evenly distributed and you are completely balanced.
  • Step 2: Keep your thigh muscles firm without hardening your belly. Lift the insides of your ankles ever so slightly so that your feet appear to be cupped. Turn the upper parts of the thighs slightly inwards and lift your pubis towards the navel while lengthening your tailbone. Try to mentally connect your groin to your inner thighs and your torso through an imaginary energy line. This will help you maintain your balance when you are stretching.
  • Step 3: Extend your shoulder blades and arch them slightly towards the back. Keep them stretched and then slowly release them back, but while you are doing that, do not push your ribs forward. Lift your sternum slightly and bring your arms behind your torso.
  • Step 4: Bring the centre of your head directly in line with the center of your pelvis, keeping your chin parallel to the floor. Soften your throat and eyes. Stay in this position for at lease 30 seconds. If you can keep your balance for longer, try to maintain it for about a minute. Continue to breathe easily.

Benefits of Tadasana:

1. Tadasana is the foundation of the all yoga postures. It aligns the body.
2.  It strengthens the knees, thighs and ankle joints.
3.  It corrects the postures.
4.  Tones the abdominal muscles, corrects the flat feet.
5.  This asana coordinates between mind, breath and body

Here is a video showing how to practice Tadasana


)

How to practice Veerasana - Warrior pose

The meaning of "veera" in Sanskrit is 'Warrior'.  The body assumes the position of a warrior before attacking in this asana, hence the name Veerasana or Warrior pose.  The Veerasana is very good for spinal cord health because the spinal cord is stretched in the opposite direction its elasticity increases.  The muscles at the hips, knees and thighs are stretched well.  There will be improved flexibility in the shoulders too.  

The Veerasana also improves the strength in the ankles, legs and back.  The muscles in the abdominal region are stretched well, so they will tone the organs in this region.  Here is a step by step instructions to practice Veerasana.


Steps to practice Veerasana

  • Stand straight in Tadasana.  with legs joined together and arms by the sides.
  • Now stretch your left leg and place it on front while exhaling
  • Slowly bend the left leg at the knee so as to form a right angle between the thigh and calf
  • Now join the palms of your hands and place them on the knee
  • Please keep the right leg straight
  • Raise your both hands above your head while inhaling
  • Stretch your arms further up
  • Now bend the upper part of your body backwards
  • The inner side of upper arms should be touching the ears
  • Bend your neck and head downwards by balancing your body
  • Try to increase the curvature of the body to the maximum limit possible
  • Gaze up
  • The right leg should not bend and the sole of both feet should be on the ground
  • Stay in this posture till feet get strained
  • Now exhale slowly and straighten your trunk
  • Inhale and bring the hands down on the kneew
  • Return left foot to the original position aligned with the right foot, as you exhale
  • Relax and perform the same with your right leg stretched forward

Caution :
  • Do not try to overdo the asana if you are a beginner.
  • Losing the balance may lead to injuries.. be careful
  • Do not perform this yoga asana if you suffer form shoulder or neck problems

Benefits of Veerasana

Here are some of the benefits of practicing veerasana.
  • The shoulder, arms and legs gain strength
  • Thighs get extended and get toned
  • The spine gets flexible by practicing Veerasana 

Here is a video showing how to practice Veerasana.

)  

Tuesday, March 4, 2014

How to practice Vrikshasana - The Tree Pose

For most of the beginners in Yoga,  the balancing poses are extremely challenging.  Some times it is very hard to do an asana with two feet on the ground, let alone to avoid toppling over while standing on one foot.  


If you’ve ever tripped off a curb or slipped on a patch of ice, you probably understand the benefit of having a good sense of balance. Practicing balancing poses in yoga, such as Tree Pose, will help you gain both physical and mental steadiness and poise.

Tree pose or Vrikshasana  is one of the asanas done in standing position and it is considered to be a beginer level posture. When practiced regularly it increases the body balance as well as increase in concentration. This is one of the initial poses when one starts of on yoga. Once you are adept with this pose then include once or twice in your asana schedule.

The Tree pose improves focus and concentration while calming your mind.   Tree Pose improves focus and concentration while calming your mind. Its Sanskrit name, “Vrksasana” (vrik-SHAH-suh-nuh), comes from two words:

  • “Vrksa,” which means “tree”
  • “Asana,” which means “pose”
This posture replicates the graceful, steady stance of a tree. Unlike most yoga poses, the Tree Pose requires keeping our eyes open in order to maintain body balance.  The Vrikshasana helps to improve your balance and strengthens your thighs, calves, ankles and spine.  This asana is also good for stretching the inner thighs, chest and shoulders.  

While there are a number of benefits of tree pose, it also improves concentration.   If you are a student, you can immediately notice how your balancing improves when you focus your eyes on a single point.  This article gives you step by step method to practice the Vrikshasana or the Tree Pose.


Steps to practice the Tree Pose or Vrikshasana

  • Stand straight with arms by the side of your body.
  • Now bend your right knee and place the right foot high up on your left thigh.  The sole of the foot should be placed flat and firmly near the root of the thigh.
  • Make sure that your left leg is straight.  Try to maintain your balance.
  • Once you are well balanced, take a deep breath in,  raise your arms over your head from the side and bring your palms together in "Namaste" mudra ( Hands folded position).
  • Look straight ahead in front of you, at a distant object. A steady gaze helps maintain a steady balance.
  • Make sure that your spine is straight.  Your entire body should be like a stretched elastic band.  Keep taking long breaths.  With each exhalation, relax the body more and more.  Breath with a gentle smile on your face.
  • Repeat this posture with left leg off the ground on the right thigh.

 Benefits of Vrikshasana

  • This pose leaves you in a state of rejuvenation. It stretches the legs, back and    arms, and invigorates you.
  •  It brings balance and equilibrium to your mind.
  •  It helps improve concentration.
  •  This posture has been found to relieve some cases of sciatica.
  •  It makes the legs strong, improves balance, and opens the hips.
Caution : 
Avoid doing this posture if you are suffering from migraine, insomnia, low or high blood pressure (those with high blood pressure may do this pose but without raising their hands overhead, as this may further raise their blood pressure).

Here is a video showing the steps to practice Vrikshasana or the Tree Pose.


Sunday, March 2, 2014

Ushtrasana - Camel pose steps and benefits

Ushtrasana also known as camel pose.  In Sanskrit 'ushtra' means Camel.  The body looks like the shape of camel while doing this asana, so it is called as Ushtrasana.  The Ushtrasana is very good for back problems, relaxing mind, blood circulation, respiratory system, endocryne and nervous system.  

The Ushtrasana is a popular intermediate back bend which has strong effect on chest and upper back.  Let us now see how to practice Ushtrasana.  Here is a step by step procedure to perform Ushtrasana.

Here is a video showing how to perform Ushtrasana.


Uttanpadasana - Leg raised yoga pose and its benefits

The Uttanpadasana also called as Raised Foot Pose is one of the classic pose which is performed in the supine position.  The meaning of 'ut' is to lift, 'tan' is to stretch and 'pad' means leg.  This pose involves raising the legs and is used as an exercise to reduce and tone the belly.  The Uttanpadasana also called as Dwipadasana as 'dwi' means two and 'pada' means legs.

The Uttanpadasana or the raised leg pose is very useful for those having back pain and stomach disorder. People who want to have a flat stomach can practice this yoga asana.  This asana is very good for strengthening abdominal muscles.  You can also practice this asana by raising one leg at a time also.  Here are the step by step instructions to practice Uttanpadasana.


Steps to practice Uttanpadasana

  • Begin this pose by coming to a supine position with your back on the ground as shown in the image above.
  • Both your feet and knees should be kept together and your breathing should be normal. 
  • While breathing out, let your back arch by lifting your chin up and turning your head back till the crown of your head is on the floor. You can use your hands to move your head backward if necessary. Keep your arms at your sides and breathe normally.
  • Now stretch your back and take a deep breath. Then simultaneously lift both your legs to a 50-degree angle from the ground.
  • Hold this posture for some time ( 15 to 20 seconds)  to feel pressure in lower abs.
  • Now lift your arms up and keep them parallel to the ground and above your torso. Make sure that both your legs and arms are kept straight and not bent at the elbows or knees. Continue breathing normally. At this point only the crown of your head and your buttocks will bear the weight of your body.
  • To get out of this pose take a deep breath and bring both your legs and arms down to the ground. Bring your back down to the floor, make your body straight and relax. Rest for a little while and repeat the steps. You can practice five rounds of this pose.


Precautions for Uttanpadasana

  • Pregnant women should avoid Uttanpadasana for first few months. They should consult a doctor before practicing this asana in the third trimester.  Can take the support of wall while practicing.
  • People suffering from high blood pressure, slip disc, ulcer or abdominal surgery should not do this asana
  • Practice of this asana should be done under expert guidance.  
  • People recovering from an injury to the spine should perform this asana by lifting one leg at a time. The reason for this is that lifting both legs would put much strain on the spine.
  • Do not practice this asana more than 5 times a day.

Benefits of Uttanpadasana

Here are some of the benefits of practicing Uttanpadasana.
  • This asana cures stomach dosorders like indigestion, acidity or constipation
  • The asana strengthens the abdominal organs
  • Back and thigh muscles get strengthened
  • This asana is helpful for those suffering from gas problems, acidity, arthritis pain, heart problems and waist pain.,
  • The asana cures back pain
  • Reduces stomach and tones the stomach muscles
  • Useful for loosing weight
  • Good asana for diabetic patients
  • Digestive system is improved
  • Gases are removed from intestine
  • reduces weight in abdominal area, thighs and hips
  • Excellent asana for 6 pack abs

Here is a video showing how to practice Uttanpadasana

Datta Mudra - How to practice

Yoga is believed to be as old as civilization but some scholars have traced it back to 3000 B.C.  Dattamudra is an asana for the beginner.  In this article, you will learn how to practice Datta Mudra.

How to practice Datta Mudra

  • In this Dattamudra position, one need to be seated in Vajrasana Position. 
  • Fold legs inwards from the knees and sit straight in that position.  Hold your head high and rest your palms on the knees.
  • In the Vajrasana position, turn your neck to the left side as much as possible, relax all the muscles and continue normal breathing.
  • Repeat the same by turning your neck to the right side. 
  • That is all.  You need to turn your neck to left side and then to the right side in Vajrasana Position.

Benefits of Datta Mudra

The Datta Mudra is very much useful in reducing stress and anxiety.  This is because it relaxes the body muscles, giving proper stretch to neck and back.

 
Design by Free WordPress Themes | Bloggerized by Lasantha - Premium Blogger Themes | Justin Bieber, Gold Price in India